
Milesight Smart Scene Panel WS156
Installation
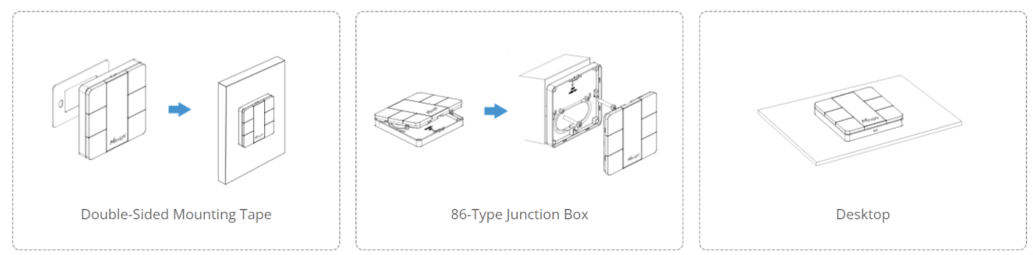
Use double-sided adhesive tape that is included in box
Put the adhesive tape on the unit first
Clean surface on the wall/desktop where the Smart Panel will be installed
Mount the Smart panel on the cleaned surface
This hardware has flexible installation options as seen in the image below.
Changing Image Displayed on the Smart Scene Panel
Download the desired image to your phone
Open Toolbox app from your phone and click on the Blue NFC Ready to Scan icon at the bottom middle of screen
.jpg?inst-v=15b567b0-8846-4933-ae7a-5e46f320556f)
.jpg?inst-v=15b567b0-8846-4933-ae7a-5e46f320556f)
Touch the phone on the Panel where it says “Milesight”
After connecting, tap on the settings tab
.jpg?inst-v=15b567b0-8846-4933-ae7a-5e46f320556f)
.jpg?inst-v=15b567b0-8846-4933-ae7a-5e46f320556f)
If you are using a Smart Panel template that records if its a Customer or Manager who pushed the button, pls go to Active Mode and choose “Short Press, Long Press”
.jpg?inst-v=15b567b0-8846-4933-ae7a-5e46f320556f)
If you are using a Smart Panel template that only uses 1 Press type choose Short Press
.jpg?inst-v=15b567b0-8846-4933-ae7a-5e46f320556f)
Click on E-ink Display Settings
.jpg?inst-v=15b567b0-8846-4933-ae7a-5e46f320556f)
Click on Custom
.jpg?inst-v=15b567b0-8846-4933-ae7a-5e46f320556f)
Choose the image
Tap Write Button
.jpg?inst-v=15b567b0-8846-4933-ae7a-5e46f320556f)
Touch the phone on the Panel where it says “Milesight”
Image should change on the Smart Scene Panel screen.